You’ve selected the perfect water-based release agent. You’ve invested in high-quality formwork. Your mix design is optimized. Yet, the concrete surface still shows defects. What went wrong?
In my 20 years of experience, 90% of release agent failures are due to improper application, not product quality. The best release agent in the world cannot compensate for poor application technique. This guide will teach you everything you need to know about applying release agents correctly—from preparation to quality acceptance.
Why Application Technique Matters
The Application-Result Connection
Release agents work by forming a micro-thin film (2-5 microns) between formwork and concrete. This film must be:
- Uniform in thickness across the entire surface
- Complete in coverage with no gaps or missed areas
- Properly applied at the right time and conditions
- Correctly cured before concrete placement
Any deviation from optimal application parameters compromises the protective barrier, leading to:
- Adhesion problems (concrete sticking to formwork)
- Surface defects (bugholes, stains, discoloration)
- Inconsistent quality across different areas
- Formwork damage from forced removal
Part 1: Pre-Application Preparation
Formwork Cleaning Standards
Before applying any release agent, formwork must be thoroughly cleaned. This is non-negotiable.
Cleaning Requirements by Formwork Type
Steel Formwork:
- Remove all concrete residue (use wire brush or scraper)
- Remove rust and scale (sandblasting if necessary)
- Degrease with appropriate solvent
- Final cleaning: Clean water rinse
- Surface roughness: Ra < 1.0μm
- Cleanliness standard: No visible residue, oil, or contaminants
Aluminum Formwork:
- Remove concrete residue (plastic scraper to avoid scratching)
- Clean with mild detergent solution
- Rinse thoroughly with clean water
- Dry completely before application
- Surface condition: Smooth, no scratches or dents
- Cleanliness standard: Water-break test passes (water sheets evenly)
Plywood Formwork:
- Remove all concrete residue
- Sand smooth if surface is rough
- Clean with water and mild detergent
- Allow to dry completely (moisture content < 12%)
- Surface condition: Smooth, sealed, no delamination
- Cleanliness standard: No dust, oil, or previous release agent residue
Cleaning Methods
| Method | Application | Effectiveness | Time Required |
|---|---|---|---|
| Wire Brush | Steel forms, heavy residue | High | 5-10 min/m² |
| Plastic Scraper | Aluminum, light residue | Medium | 3-5 min/m² |
| Sandblasting | Steel, severe rust/scale | Very High | 10-15 min/m² |
| Pressure Washing | All types, general cleaning | High | 2-3 min/m² |
| Solvent Cleaning | Oil/grease removal | High | 3-5 min/m² |
Cleaning Inspection Checklist
Before proceeding to release agent application, verify:
- All concrete residue removed
- No oil, grease, or contaminants visible
- Surface is dry (no moisture)
- No damage to formwork surface
- Sealing intact (for plywood)
- Surface smoothness meets requirements
- Water-break test passes (for metal forms)
Environmental Conditions
Environmental factors significantly affect release agent application and performance.
Temperature Requirements
Optimal Temperature Range: 15-25°C (59-77°F)
Too Cold (< 10°C / 50°F):
- Release agent viscosity increases
- Film formation becomes uneven
- Drying time extends significantly
- Air permeability decreases
Solutions for Cold Weather:
- Store release agent at 15-20°C before use
- Warm formwork surface if possible
- Use slightly higher application pressure
- Extend drying time before concrete placement
Too Hot (> 30°C / 86°F):
- Release agent may dry too quickly
- Film may become too thin in some areas
- Evaporation can cause uneven coverage
- Application becomes difficult
Solutions for Hot Weather:
- Apply during cooler hours (early morning/evening)
- Increase application rate slightly
- Work in smaller sections
- Monitor drying time closely
Humidity Requirements
Optimal Humidity: 40-70% RH
High Humidity (> 80% RH):
- Drying time extends
- Film may not form properly
- Risk of water contamination
Low Humidity (< 30% RH):
- Drying too fast
- Uneven film formation
- Potential for over-application
Wind Conditions
Maximum Wind Speed: 5 m/s (11 mph)
High wind causes:
- Uneven spray pattern
- Overspray and waste
- Contamination of adjacent areas
- Safety hazards
Solutions:
- Use windbreaks if necessary
- Adjust spray angle and distance
- Work in sheltered areas when possible
Equipment Preparation
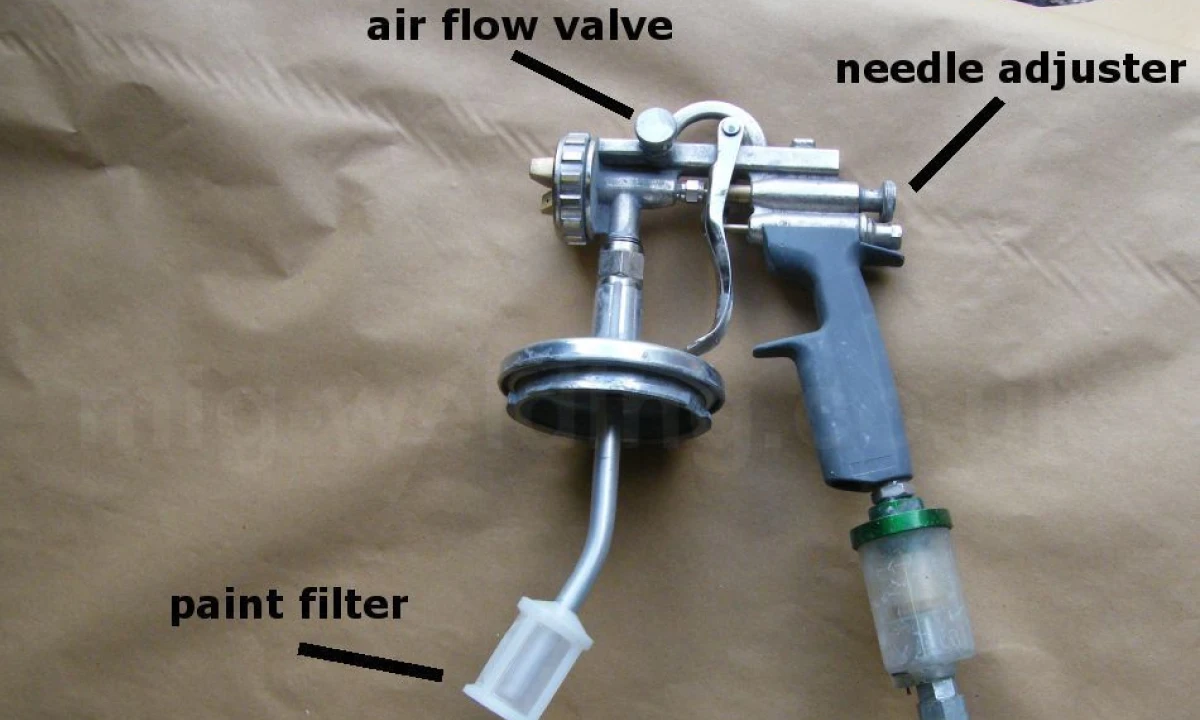
Spray Equipment Selection
Types of Spray Equipment:
-
Airless Spray Gun (Recommended)
- Pressure: 2-4 bar (30-60 psi)
- Nozzle size: 0.8-1.2 mm
- Advantages: Uniform application, efficient, good control
- Best for: Large surfaces, production work
-
HVLP (High Volume Low Pressure) Spray Gun
- Pressure: 0.5-1.5 bar (7-22 psi)
- Nozzle size: 1.0-1.5 mm
- Advantages: Low overspray, good for detailed work
- Best for: Complex shapes, architectural elements
-
Paint Roller
- Roller type: Short nap (3-6 mm)
- Advantages: Simple, no equipment needed
- Disadvantages: Less uniform, slower
- Best for: Small areas, touch-ups
-
Brush Application
- Brush type: Synthetic bristle, 50-75 mm wide
- Advantages: Precise control, no overspray
- Disadvantages: Time-consuming, potential for streaks
- Best for: Corners, edges, small details
Equipment Calibration
Before Each Use:
-
Check Pressure Settings
- Verify pressure gauge accuracy
- Set to recommended pressure (check product datasheet)
- Test spray pattern on cardboard
-
Inspect Nozzle
- Check for clogs or damage
- Verify nozzle size matches specification
- Clean if necessary
-
Test Spray Pattern
- Spray on test surface (cardboard or scrap formwork)
- Verify uniform fan pattern
- Check coverage width
- Adjust if needed
-
Verify Flow Rate
- Measure application rate (ml/m²)
- Compare to recommended rate
- Adjust pressure or nozzle if needed
Equipment Maintenance
After Each Use:
- Flush system with clean water
- Clean nozzle thoroughly
- Check for wear or damage
- Store in clean, dry location
Weekly Maintenance:
- Deep clean all components
- Replace worn parts
- Calibrate pressure gauges
- Lubricate moving parts
Material Preparation
Dilution (If Required)
Check Product Datheet:
- Some products are ready-to-use
- Others require dilution with water
- Follow manufacturer’s instructions exactly
Dilution Process:
- Use clean, potable water
- Measure accurately (use measuring container)
- Add water to release agent (not reverse)
- Mix thoroughly but gently (avoid excessive foaming)
- Let stand 5-10 minutes for stabilization
- Mix again before use
Common Dilution Ratios:
- Ready-to-use: No dilution
- Concentrated: 1:3 to 1:5 (agent:water)
- Always verify with product datasheet
Mixing
Manual Mixing:
- Use clean container
- Stir gently to avoid foaming
- Mix for 2-3 minutes
- Check for uniform consistency
Mechanical Mixing:
- Use low-speed mixer
- Avoid high-speed mixing (creates foam)
- Mix for 1-2 minutes
- Let stand briefly before use
Storage and Handling
Storage Conditions:
- Temperature: 5-30°C (41-86°F)
- Protect from freezing
- Keep containers sealed
- Store away from direct sunlight
Shelf Life:
- Check expiration date
- Use within recommended period
- Don’t use if separated or contaminated
Part 2: Application Techniques
Spray Application (Primary Method)
Spray Technique Fundamentals
Spray Distance:
- Optimal: 20-30 cm (8-12 inches) from surface
- Too close: Puddling, uneven thickness
- Too far: Overspray, waste, thin coverage
Spray Angle:
- Optimal: 90° (perpendicular to surface)
- Range: 75-90° acceptable
- Avoid: < 60° (causes uneven coverage)
Spray Speed:
- Optimal: 0.5-1.0 m/s (1.6-3.3 ft/s)
- Consistent speed: Critical for uniform thickness
- Practice: Use metronome or count to maintain rhythm
Overlap:
- Optimal: 30-50% overlap between passes
- Pattern: Horizontal or vertical, maintain consistency
- Avoid: Gaps between passes
Application Pattern
For Large Flat Surfaces:
- Start at top (if vertical surface)
- Horizontal passes: Left to right (or right to left)
- Move down systematically
- 30-50% overlap on each pass
- Complete one section before moving to next
For Complex Shapes:
- Start with edges and corners
- Apply to detailed areas first
- Finish with large flat areas
- Ensure complete coverage in all areas
Application Thickness Control
Target Thickness: 2-5 microns (0.002-0.005 mm)
Visual Indicators:
- Too thin: Surface appears dry immediately, no sheen
- Too thick: Visible pooling, runs, or drips
- Correct: Uniform sheen, no pooling, no dry spots
Measurement Methods:
-
Wet Film Thickness Gauge
- Apply gauge immediately after spraying
- Read thickness directly
- Adjust application if needed
-
Application Rate Method
- Measure release agent used (ml)
- Measure area covered (m²)
- Calculate: ml/m²
- Compare to recommended rate (typically 100-200 ml/m²)
-
Visual Inspection
- Uniform sheen across surface
- No dry spots
- No pooling or runs
- Complete coverage
Thickness Guidelines by Formwork Type:
| Formwork Type | Target Thickness | Application Rate |
|---|---|---|
| Steel | 2-3 microns | 100-150 ml/m² |
| Aluminum | 2-4 microns | 120-180 ml/m² |
| Plywood | 3-5 microns | 150-200 ml/m² |
| Plastic | 2-3 microns | 100-150 ml/m² |
Brush Application
When to Use Brushes
- Corners and edges: Where spray cannot reach
- Small areas: Less than 1 m²
- Touch-ups: After spray application
- Complex details: Intricate formwork shapes
Brush Technique
- Load brush: Dip 1/3 of bristle length
- Remove excess: Tap against container edge
- Apply in one direction: Long, smooth strokes
- Overlap strokes: 30-50% overlap
- Final pass: Light brush to ensure uniformity
- Avoid: Back-and-forth brushing (causes streaks)
Common Brush Application Mistakes
- Overloading brush: Causes drips and runs
- Insufficient coverage: Missing areas
- Streaking: Uneven application
- Brush marks: Visible after application
Roller Application
When to Use Rollers
- Large flat surfaces: When spray equipment unavailable
- Quick application: For non-critical surfaces
- Backup method: When spray fails
Roller Technique
- Load roller: Dip in release agent, roll on tray
- Apply in “W” pattern: Then fill in
- Maintain wet edge: Work in sections
- Light final pass: To ensure uniformity
- Check coverage: Ensure no missed areas
Special Application Considerations
Corners and Edges
Challenge: Hardest areas to cover uniformly
Solution:
- Apply to corners first (brush or spray)
- Use brush for inside corners
- Ensure complete coverage
- Check with light reflection
Vertical Surfaces
Challenge: Risk of runs and drips
Solution:
- Start at top, work down
- Use slightly lower application rate
- Monitor for runs
- Remove any drips immediately
Horizontal Surfaces
Challenge: Pooling in low spots
Solution:
- Ensure formwork is level
- Use lower application rate
- Spread evenly with brush if needed
- Remove any pooling
Complex Shapes
Challenge: Uneven coverage on curved surfaces
Solution:
- Use combination of spray and brush
- Apply to detailed areas first
- Maintain consistent distance
- Verify coverage from multiple angles
Part 3: Common Application Mistakes and Consequences
Mistake 1: Over-Application
What Happens:
- Release agent pools in low areas
- Film becomes too thick (10+ microns)
- Air bubbles trapped in thick film
- Bugholes form during concrete placement
Visual Signs:
- Visible pooling or puddles
- Runs or drips on vertical surfaces
- Uneven sheen (very shiny in some areas)
Consequences:
- Bugholes: 2-3× higher than normal
- Surface defects: Staining, discoloration
- Waste: 50-100% more material used
- Cost impact: $0.20-0.40 per m² wasted
How to Fix:
- Remove excess immediately with clean cloth
- Reapply thin, uniform coat
- Use wet film thickness gauge to verify
Mistake 2: Under-Application
What Happens:
- Incomplete film formation
- Gaps in coverage
- Concrete adheres to formwork
- Forced removal damages formwork
Visual Signs:
- Dry spots or areas with no sheen
- Incomplete coverage visible
- Uneven appearance
Consequences:
- Adhesion: Concrete sticks to formwork
- Formwork damage: Forced removal causes damage
- Surface defects: Tearing, rough patches
- Rework required: 100% of affected areas
How to Fix:
- Identify missed areas immediately
- Apply additional coat to dry areas
- Verify complete coverage before concrete placement
Mistake 3: Uneven Application
What Happens:
- Thick areas alternate with thin areas
- Inconsistent film thickness
- Variable release performance
- Uneven concrete surface
Visual Signs:
- Patchy appearance
- Alternating shiny and dull areas
- Visible streaks or patterns
Consequences:
- Inconsistent quality: Some areas perfect, others defective
- Surface variation: Color and texture differences
- Partial adhesion: Some areas stick, others release cleanly
How to Fix:
- Practice consistent spray technique
- Use guide marks for spray pattern
- Maintain constant speed and distance
- Verify with visual inspection
Mistake 4: Wrong Application Timing
What Happens:
- Too early: Release agent dries before concrete placement
- Too late: Release agent not dry when concrete placed
- Both cause poor performance
Timing Guidelines:
| Condition | Drying Time | Application Timing |
|---|---|---|
| Normal (20°C, 50% RH) | 15-30 minutes | 30-60 min before concrete |
| Hot/Dry (30°C, 30% RH) | 5-10 minutes | 15-30 min before concrete |
| Cold/Humid (10°C, 80% RH) | 60-120 minutes | 2-3 hours before concrete |
Consequences:
- Too early: Film degrades, poor release
- Too late: Wet film mixes with concrete, staining
- Both: Surface defects, adhesion problems
How to Fix:
- Plan application schedule carefully
- Monitor environmental conditions
- Test drying time in current conditions
- Adjust timing based on conditions
Mistake 5: Poor Equipment Maintenance
What Happens:
- Clogged nozzles cause uneven spray
- Worn parts cause inconsistent application
- Pressure fluctuations affect film thickness
- Contaminated equipment introduces defects
Common Equipment Problems:
| Problem | Cause | Effect | Solution |
|---|---|---|---|
| Clogged nozzle | Dried release agent | Uneven spray pattern | Clean regularly |
| Worn nozzle | Age, abrasion | Overspray, waste | Replace when worn |
| Pressure fluctuation | Faulty regulator | Inconsistent thickness | Calibrate, repair |
| Contamination | Previous materials | Staining, defects | Clean thoroughly |
Consequences:
- Inconsistent application: Variable quality
- Waste: Overspray, rework
- Defects: Staining, contamination
- Downtime: Equipment failure delays work
How to Fix:
- Regular maintenance schedule
- Clean after each use
- Inspect before each use
- Replace worn parts promptly
Mistake 6: Ignoring Environmental Conditions
What Happens:
- Application in unsuitable conditions
- Poor film formation
- Inconsistent performance
- Defects and failures
Environmental Mistakes:
-
Applying in rain or high humidity
- Film doesn’t dry properly
- Water contamination
- Poor release performance
-
Applying in extreme cold
- High viscosity
- Uneven application
- Poor film formation
-
Applying in high wind
- Overspray and waste
- Uneven coverage
- Contamination of adjacent areas
Consequences:
- Poor quality: Defects and failures
- Waste: Material and time
- Rework: Complete reapplication required
How to Fix:
- Monitor weather conditions
- Wait for suitable conditions
- Use environmental controls if possible
- Adjust technique for conditions
Part 4: Quality Control and Acceptance
Post-Application Inspection
Visual Inspection Checklist
Immediately After Application:
- Uniform coverage: No dry spots or missed areas
- Consistent sheen: Even appearance across surface
- No pooling: No puddles or runs
- Complete coverage: All areas including corners and edges
- Proper thickness: Visual indicators correct
- No contamination: Clean, no foreign materials
After Drying (Before Concrete Placement):
- Film formed: Uniform, continuous film visible
- No defects: No cracks, peeling, or degradation
- Dry surface: No wet or tacky areas
- Ready for concrete: All conditions met
Thickness Measurement
Methods:
-
Wet Film Thickness Gauge
- Measure immediately after application
- Take multiple readings (at least 5 per 10 m²)
- Average should be 2-5 microns
- No reading should be < 1 micron or > 8 microns
-
Application Rate Calculation
- Measure release agent used (ml)
- Measure area covered (m²)
- Calculate: ml/m²
- Compare to target: 100-200 ml/m²
-
Visual Assessment
- Uniform sheen indicates proper thickness
- Dry spots indicate too thin
- Pooling indicates too thick
Coverage Verification
Methods:
-
Visual Inspection
- Check from multiple angles
- Use light reflection to identify missed areas
- Verify corners and edges
-
Water-Break Test (for metal forms)
- Lightly mist with water
- Water should sheet evenly
- Beading indicates missed areas
-
Systematic Check
- Divide surface into sections
- Check each section methodically
- Mark any missed areas for touch-up
Acceptance Criteria
Quality Standards
For Fair-Faced Concrete (Class A):
| Parameter | Requirement | Test Method |
|---|---|---|
| Coverage | 100% complete | Visual inspection |
| Thickness | 2-5 microns | Wet film gauge |
| Uniformity | No visible variation | Visual inspection |
| Drying | Complete, no tackiness | Touch test |
| Defects | None | Visual inspection |
For Structural Concrete (Class B/C):
| Parameter | Requirement | Test Method |
|---|---|---|
| Coverage | > 95% complete | Visual inspection |
| Thickness | 2-6 microns | Wet film gauge |
| Uniformity | Acceptable variation | Visual inspection |
| Drying | Complete | Touch test |
| Defects | Minimal, acceptable | Visual inspection |
Documentation
Record the Following:
- Application Date and Time
- Environmental Conditions (temperature, humidity, wind)
- Release Agent Used (product name, batch number)
- Application Method (spray, brush, roller)
- Application Rate (ml/m²)
- Thickness Measurements (if taken)
- Inspector Name and signature
- Acceptance Status (approved/rejected)
Photographs:
- Take photos of application
- Document any issues
- Keep for quality records
Corrective Actions
If Application Fails Inspection
Minor Issues (Touch-up Required):
- Missed small areas: Apply release agent to missed areas
- Slight unevenness: Light additional application
- Minor pooling: Remove excess, verify thickness
Major Issues (Reapplication Required):
- Incomplete coverage: Remove and reapply completely
- Severe over-application: Remove excess, reapply
- Contamination: Clean formwork, reapply
- Wrong timing: Remove if possible, reapply at correct time
Decision Tree:
Application Inspection
├─ Passes all criteria → Proceed with concrete placement
├─ Minor issues → Touch-up, reinspect
└─ Major issues → Remove, clean, reapply
Part 5: Special Application Scenarios
Large Flat Surfaces (Walls, Slabs)
Challenges:
- Maintaining consistency over large area
- Avoiding missed areas
- Managing application timing
Best Practices:
- Divide into sections: Work in 5-10 m² sections
- Systematic pattern: Left-to-right, top-to-bottom
- Maintain wet edge: Don’t let sections dry before connecting
- Team coordination: Multiple applicators if needed
- Quality checkpoints: Inspect each section before proceeding
Application Rate:
- 120-180 ml/m² for large surfaces
- Slightly higher than small areas (compensate for overspray)
Complex Shapes (Columns, Beams, Nodes)
Challenges:
- Hard-to-reach areas
- Varying surface angles
- Corners and edges
Best Practices:
- Start with details: Apply to corners and edges first
- Use combination method: Spray for large areas, brush for details
- Multiple angles: Check coverage from all sides
- Extra attention: Corners and inside angles need careful application
- Verification: Inspect from multiple viewpoints
Application Sequence:
- Inside corners (brush)
- Edges and details (brush or careful spray)
- Large flat areas (spray)
- Final verification (visual inspection)
Repeated Use Formwork
Special Considerations:
After First Use:
- Clean thoroughly (more important than first application)
- Inspect for damage
- Repair if necessary
- Apply release agent as for new formwork
After Multiple Uses:
- Deep cleaning may be required
- Check surface condition
- May need surface treatment (sanding, sealing)
- Apply release agent with attention to wear areas
Application Adjustments:
- Slightly higher application rate for worn formwork
- Extra attention to high-wear areas
- May need brush application for damaged areas
Winter Construction
Temperature Challenges:
- Low temperature increases viscosity
- Extended drying time
- Poor film formation
Solutions:
- Pre-warm release agent: Store at 15-20°C before use
- Warm formwork: If possible, warm formwork surface
- Higher application pressure: Compensate for viscosity
- Extended drying time: Allow 2-3× normal drying time
- Protect from freezing: Don’t apply if temperature < 5°C
Application Adjustments:
- Slightly higher application rate (150-200 ml/m²)
- Longer drying time (60-120 minutes)
- Monitor temperature continuously
- Consider heated application area
Summer Construction
Temperature Challenges:
- High temperature causes fast drying
- Evaporation before complete coverage
- Difficult to maintain wet edge
Solutions:
- Apply during cooler hours: Early morning or evening
- Work in smaller sections: Complete before drying
- Slightly higher application rate: Compensate for evaporation
- Shade formwork: If possible, protect from direct sun
- Monitor drying closely: Adjust timing as needed
Application Adjustments:
- Work faster to maintain wet edge
- Smaller section sizes (3-5 m²)
- May need misting to slow drying (check product compatibility)
Technical Specifications and Standards
Application Parameters Summary
| Parameter | Optimal Range | Acceptable Range | Notes |
|---|---|---|---|
| Spray Distance | 20-30 cm | 15-35 cm | Adjust for conditions |
| Spray Angle | 90° | 75-90° | Perpendicular preferred |
| Spray Speed | 0.5-1.0 m/s | 0.3-1.5 m/s | Consistent speed critical |
| Overlap | 30-50% | 25-60% | Maintain consistency |
| Film Thickness | 2-5 microns | 1-8 microns | Measure if possible |
| Application Rate | 120-180 ml/m² | 100-200 ml/m² | Varies by formwork type |
| Drying Time | 15-30 min | 10-120 min | Depends on conditions |
Equipment Specifications
| Equipment Type | Pressure | Nozzle Size | Flow Rate | Best For |
|---|---|---|---|---|
| Airless Spray | 2-4 bar | 0.8-1.2 mm | 200-400 ml/min | Large surfaces |
| HVLP Spray | 0.5-1.5 bar | 1.0-1.5 mm | 150-300 ml/min | Detailed work |
| Paint Roller | N/A | Short nap | Manual | Backup method |
| Brush | N/A | 50-75 mm | Manual | Details, touch-up |
Case Studies
Case Study 1: High-Rise Residential Project
Project Details:
- Location: Shanghai, China
- Structure: 40-story residential tower
- Requirement: Class A fair-faced concrete
- Challenge: Consistent quality across 10,000+ m²
Initial Approach:
- Used multiple applicators without coordination
- Inconsistent techniques
- No quality control checkpoints
Problems Encountered:
- Surface quality varied significantly
- 15% of surfaces required rework
- Delays from inconsistent application
Solution Implemented:
- Standardized application procedure
- Trained all applicators on same technique
- Established quality checkpoints every 50 m²
- Designated quality inspector
Results:
- Consistency: 95% of surfaces met Class A standard
- Rework: Reduced to < 2%
- Time: Application time increased 20%, but rework time reduced 80%
- Cost: Net savings of $45,000 from reduced rework
Key Learnings:
- Standardization is critical for large projects
- Quality control checkpoints prevent problems
- Training pays for itself in reduced rework
Case Study 2: Architectural Concrete Facade
Project Details:
- Location: Beijing, China
- Structure: Museum facade with complex geometry
- Requirement: Perfect surface, no defects
- Challenge: Complex shapes, tight tolerances
Initial Approach:
- Used spray gun for all areas
- Standard application technique
- No special attention to details
Problems Encountered:
- Adhesion in corners and edges
- Surface defects in complex areas
- Inconsistent quality
Solution Implemented:
- Combination method: Brush for details, spray for large areas
- Extra application to corners and edges
- Detailed inspection from multiple angles
- Touch-up procedure for missed areas
Results:
- Quality: 100% of surfaces met requirements
- Defects: Zero defects in complex areas
- Client satisfaction: Exceeded expectations
Key Learnings:
- Complex shapes require specialized techniques
- Combination methods work best for details
- Extra time in application saves rework time
Best Practices Checklist
Pre-Application
- Formwork cleaned to standard
- Environmental conditions suitable
- Equipment calibrated and tested
- Release agent prepared (diluted if needed)
- Application plan established
- Team briefed on procedure
During Application
- Maintain consistent technique
- Follow systematic pattern
- Monitor application rate
- Check coverage continuously
- Maintain proper distance and angle
- Work at appropriate speed
Post-Application
- Visual inspection completed
- Thickness verified (if measured)
- Coverage confirmed 100%
- Drying time monitored
- Final inspection before concrete
- Documentation completed
Quality Control
- Inspection checklist completed
- Acceptance criteria met
- Issues identified and resolved
- Photographs taken
- Records documented
- Approval obtained
Conclusion
Proper release agent application is not just a step in the process—it’s the difference between success and failure. The best release agent, the finest formwork, and the perfect mix design cannot compensate for poor application technique.
Key Takeaways:
- Preparation is critical: Clean formwork, proper equipment, suitable conditions
- Technique matters: Consistent application method ensures uniform quality
- Quality control is essential: Inspection and acceptance prevent problems
- Training pays off: Properly trained applicators produce better results
- Documentation protects: Records help identify and prevent future issues
The Application-Result Equation:
Perfect Release Agent + Perfect Formwork + Perfect Mix Design
+ Poor Application Technique
= Poor Results

Good Release Agent + Good Formwork + Good Mix Design
+ Excellent Application Technique
= Excellent Results
Remember: Application technique is the multiplier that determines whether your investment in quality materials pays off. Master the techniques in this guide, and you’ll achieve consistent, high-quality concrete surfaces every time.
