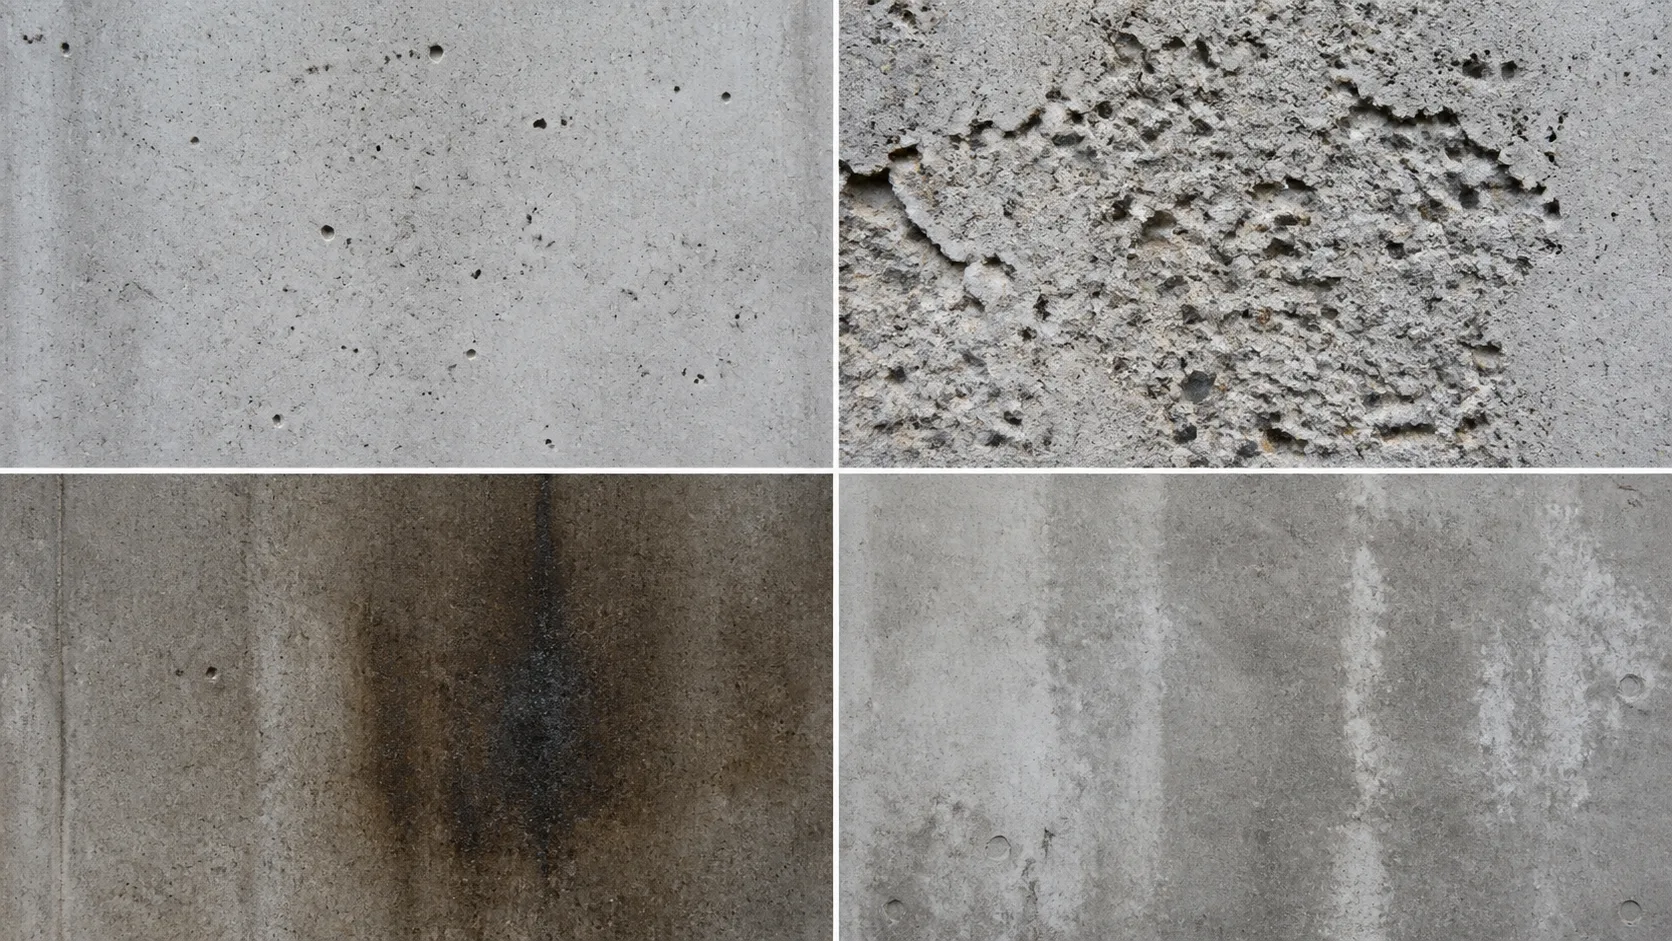
Concrete surface defects often look similar from a distance, but they do not have the same cause. A field team that treats every dark mark as a release-agent problem, or every void as a vibration problem, can spend time fixing the wrong process.
The first step is to classify the appearance. Then check where the defect occurs, compare it with the formwork condition, and review the release-agent and placement records. This article gives a practical first diagnosis for four common fair-faced concrete problems: bugholes, honeycombing, staining, and color variation.
This is a field diagnosis guide, not a substitute for an engineer’s assessment. If a defect is deep, widespread, exposes reinforcement, or affects the member’s section, treat it as a construction-quality issue that needs technical review.
Start with the shape, not the suspected cause
1. Bugholes and pinholes
Bugholes are small, rounded surface voids that usually appear as individual pits or as a cluster of shallow holes. They are often easier to see on vertical faces after the form is stripped, especially when light falls across the surface from the side.
Common clues include:
- small, mostly rounded cavities rather than broken-out aggregate;
- repeated concentrations on the same form face or pour zone;
- more holes near areas where air had difficulty escaping;
- a pattern that changes when the formwork, mix, or release film changes.
Bugholes can involve concrete workability, placement, vibration, formwork texture, and release-agent thickness at the same time. More vibration is not automatically the answer. If the release film is too heavy or the form face is rough and contaminated, the interface may continue to trap air even when the crew increases vibration.
For a deeper explanation, see Bugholes in Concrete: Why Vibration Alone Fails and How to Prevent Bugholes on Fair-Faced Concrete.
2. Honeycombing
Honeycombing is rougher and deeper than a typical bughole pattern. It may expose coarse aggregate, show connected voids, or reveal areas where mortar did not fill around the reinforcement and aggregate.
Typical clues include:
- irregular edges and a rough, broken texture;
- visible coarse aggregate or open pockets;
- concentration at congested reinforcement, corners, lifts, or form joints;
- grout loss, poor access, interrupted placement, or insufficient consolidation near the defect.
Honeycombing should not be treated as a cosmetic stain. The right response depends on its depth, location, reinforcement cover, and structural role. Photograph the area with a scale, record its location, and involve the responsible engineer or quality manager before repair.
3. Release-agent staining
Staining usually appears as a dark patch, oily shadow, uneven gloss, or brown-gray mark. Unlike a hole, it changes the color or reflectivity of the surface more than its geometry.
Look for these patterns:
- the mark follows a spray overlap or a low point in the form;
- it is darker near corners, joints, or the bottom edge;
- the form looked wet, glossy, or visibly pooled before the pour;
- a wipe test on the form leaves an oily trace;
- adjacent panels handled by different crews show different color results.
Over-application is one possible cause, but dirty formwork, waste oil, old cement paste, incompatible products, and poor storage can create similar appearances. Read Can Too Much Release Agent Cause Staining on Concrete? before deciding that adding more product will improve separation.
4. Color variation
Color variation is a broader change in tone across a panel or elevation. It can appear as light and dark zones, bands, patchy panels, or different tones between pours.
Common clues include:
- a large area changes tone without a matching change in surface texture;
- panel edges, joints, or different form materials line up with the color boundary;
- curing, moisture, temperature, or stripping time differed between pours;
- a form face has different age, absorbency, roughness, or contamination from its neighbors.
Color variation is usually a system problem rather than a single-product problem. Compare the concrete mix, water addition, formwork, release-agent coverage, curing method, and weather conditions for each affected pour. Fair-Faced Concrete: The 3 Factors That Decide Surface Quality explains how these factors work together.
Use location as a diagnostic clue
The position of a defect often narrows the cause faster than its color.
If the same mark follows a spray pass, suspect application coverage or pooling. If it repeats along a joint, check joint tightness, form alignment, and material accumulation. If it appears at the bottom of a vertical form, check whether liquid release agent collected there. If it appears around congested reinforcement or below a difficult placement zone, review concrete flow and consolidation.
If an entire panel has a different tone, compare the form face and curing history before focusing on one small blemish. If the defect appears across several panels in the same sequence, look for a process change rather than a single local accident.
A practical investigation sequence
1. Photograph the defect in neutral light
Take one wide image showing its position and one close image showing the texture. Add a ruler or another known-size reference when possible. Side lighting can reveal holes, but it can also exaggerate normal texture, so take a second image in even daylight.
2. Check whether the surface is changed in shape or only in color
A cavity, broken edge, or exposed aggregate points toward a physical surface defect. A smooth but dark area points more toward staining, moisture, curing, or color variation. The distinction is not final, but it helps choose the next inspection.
3. Inspect the formwork, not only the concrete
Record the form material, reuse count, face condition, joint condition, cleaning method, and any repair compound. A rough, dusty, absorbent, or contaminated form can reproduce its history on the concrete face.
For more on matching the product to the form, read How to Choose a Release Agent by Formwork Material.
4. Review the release-agent application
Check the product, dilution, spray method, nozzle, coverage target, number of passes, and time between application and casting. The target is a thin, continuous film, not a visibly wet layer. Also check corners, joints, recesses, and the bottom edge for accumulation.
The application process is covered in Release Agent Application: Spraying, Coverage, and Quality Control.
5. Compare the concrete and placement records
Look for changes in slump, water addition, delivery interval, temperature, lift height, placement speed, vibration method, and crew. If the defect begins after one process change, that change deserves more attention than a general assumption about the material.
6. Compare with a reference panel
For appearance-critical work, the reference panel is more useful than an isolated argument about what looks acceptable. Keep the same form material, release-agent procedure, concrete source, placement sequence, and curing method when making the comparison.
Common misdiagnoses to avoid
Treating every hole as a vibration problem
Vibration helps release entrapped air, but it cannot correct a rough form face, an unstable mix, poor access, or a release film that is too thick. Change one controlled variable at a time and compare the result.
Spraying more release agent to fix sticking
More product can create pooling, staining, and additional surface voids. Clean the form, confirm the product is suitable, and return to a thin, even film instead of increasing the amount by guesswork.
Trying to clean away an interface problem after stripping
Surface cleaning may remove loose residue, but it cannot reverse a color change or surface defect that formed at the form-concrete interface. The useful evidence is usually in the form condition and application record before the pour.
Blaming the formwork without checking the process
The form face matters, but the same panel can produce different results when the mix, release film, vibration, or curing changes. A good diagnosis compares the complete system.
A simple site record for the next pour
Before the next casting, record five items:
- Form face: material, reuse count, cleanliness, repairs, and joint condition.
- Release film: product, dilution, application method, coverage target, and visual acceptance.
- Concrete: mix identification, slump, temperature, and any water or admixture adjustment.
- Placement: lift height, sequence, delivery gaps, and vibration method.
- Finish: stripping time, curing method, weather, and photos under consistent light.
This record turns a visual complaint into a comparable process history. It also makes it easier to see whether the same defect is repeating because of the material, the form, or the way the work is being carried out.
Conclusion
The fastest way to diagnose a concrete surface defect is to classify its shape, check its location, inspect the formwork, and then review the release-agent and placement records together.
Bugholes are usually shallow rounded voids. Honeycombing is rougher and more open, with a greater need for technical assessment. Staining is mainly a color or reflectivity problem associated with residue or interface conditions. Color variation covers broader differences across panels, pours, materials, or curing conditions.
Once the appearance is classified correctly, the repair conversation becomes much more useful. The goal is not to find one product to blame. The goal is to identify the process variable that changed and make the next surface repeatable.